6 Insight processing
Insight is the pre-processing software that imports the .stl file and exports the .cmb file that controls the Fortus® 3D Printer to build the tool. Material, machine and slice-height selections are designated in Insight as well as build orientation and toolpath parameters, which control how the tool is built. The following sections on Insight processing assume a basic knowledge of Insight. See the Step-By-Step Insight Processing Procedure best practice for Insight assistance. Processing parameters such as build orientation, slice height and desired material should be designated on engineering drawings if the tools are being processed and produced externally to ensure the service provider builds the tools as desired.
6.1 Select modeler parameters and import part
PC and ULTEM 9085 resin (recommended thermoforming tool materials) are available on Fortus 400mc™, Fortus 450mc™, and Fortus 900mc™ 3D Printers. Select the desired modeler and model material in the Modeler Setup menu, located under Modelers, Setup before importing the .stl file format into Insight (Figure 10). The slice height of the build should also be chosen at this point. A larger slice height will decrease build time at the expense of surface quality. A smaller slice height will improve surface quality, but will increase overall build time. A 0.010 inch (0.254 mm) slice height is recommended for most thermoform tools as it provides a good combination of surface quality and build time. Import the thermoforming tool .stl file using File, Open.
6.1.1 Importance of build orientation
The build orientation of the .stl file is extremely important. Build orientation will affect the speed of the build, the amount of support material required, the quality of surface finish and the overall performance of the tool. The final tool design intent and requirements must be considered when orienting the part to incorporate surface finish, build time and other aspects affected by orientation. Slice the .stl file after the desired build orientation has been selected. Examples of three varying orientations are described in the following sections.
6.1.1.1 Flat (XY)
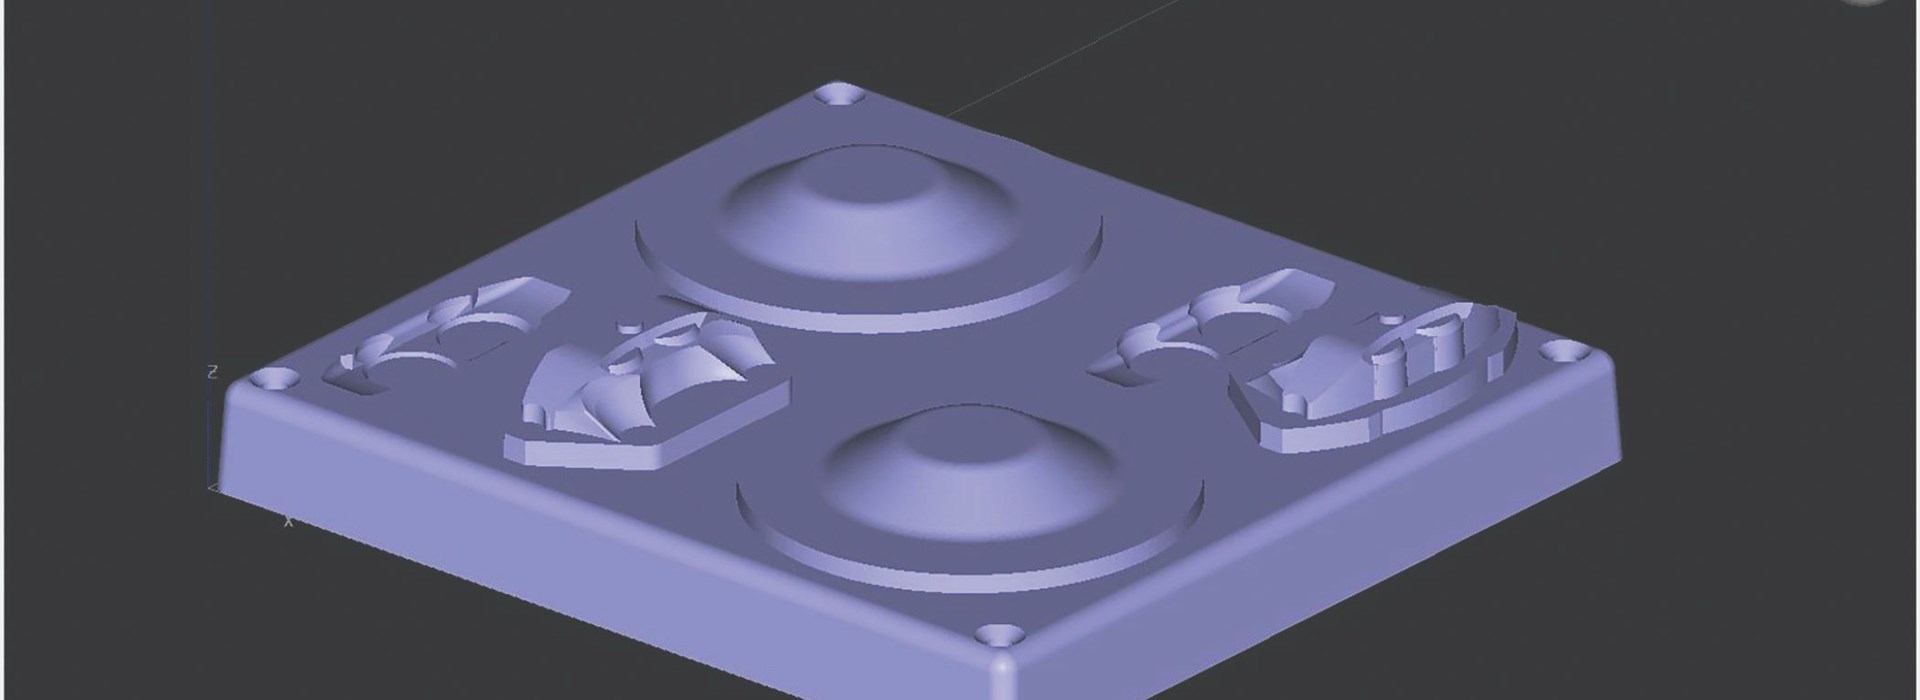
The flat or horizontal orientation in the XY plane is recommended for most thermoforming tools. A horizontal orientation is shown in Figure 11. The flat orientation provides the tool with sufficient vacuum to the inner tool surfaces while generally being faster to print, including the areas for tool run-out.
This orientation can result in a sub-optimal surface finish for this specific geometry due to stairstepping on gradually sloped faces. Stair-stepping or exaggerated layer lines are shown in Figure 12 and can require more in-depth post-processing compared with the vertically oriented tool to achieve adequate surface finish.
6.1.1.2 Vertical (XZ)
A vertical orientation with the tool in the XZ plane, shown in Figure 13, is recommended for tools with high surface finish requirements that would be stair-stepped if built horizontally. The vertical orientation will generally take longer to print due to the increase in Z-height but will require less post-processing to achieve a smooth surface finish and still permits sufficient airflow through the vertical tool face to draw down the formed sheet. A vertical orientation should also be used for tools with designed porosity as this orientation takes advantage of self-supporting angles and reduces the amount of support material needed. Figure 13 shows the orientation of a tool with tailored density.
6.1.1.3 Other orientations
When a tool does not have a simple geometry that can easily be printed in vertical or horizontal orientations, or when these orientations result in undesirable surface finish, the tool can be alternatively positioned in the build space to achieve the desired surface finish. Figure 14 demonstrates an orientation where the tool is rotated up at 45 degrees about the Y-axis. A 45 degree orientation yields a better surface finish due to reduced stair-stepping and minimizes the amount of support material needed by utilizing self-supporting angles. This custom orientation will require a stabilizer wall to be added to the back side of the tool to prevent it from tipping over during the building process (stabilizer walls are covered in Section 6.2.1 – Stabilizer Walls). To achieve the on-edge orientation seen in Figure 14, the rotation menu shown in Figure 15 can be used. The X, Y and Z angles displayed are absolute references to the original, imported orientation. To incrementally change the orientation, input the degree change and click the individual axes rotate buttons. Improving surface finish and decreasing build time and material use are the main considerations to review when orientating a part for FDM thermoform tooling.
6.2 Generate supports
Generate supports once the file has been oriented and sliced. Minimizing the amount of support will reduce the build time of the tool. It is also recommended to attempt to reduce or eliminate supports on faces of the tool that will come in contact with the thermoformed part as reduced surface quality occurs at support interfaces of the tool. ULTEM 9085 resin uses a breakaway support material only and PC has the option of either a breakaway or soluble support. Breakaway supports must be removed by hand and design considerations need to be taken to not trap supports in deep cavities, channels or holes. Breakaway support removal is aided by the default support parameters (basic for PC and sparse for ULTEM 9085 resin). The soluble support option for PC dissolves in a detergent bath, which allows for support removal from difficult areas but requires the tool to be dried after support removal as the liquid will collect in the sparse cells of the tool. Default support settings are recommend when generating supports for thermoform tooling.
6.2.1 Stabilizer walls
Thermoforming tools that have tall designs with a small footprint on the build sheet may require additional support to enhance stability and prevent build failure. Stabilizer walls are typically only needed with tools being built in vertical or nonstandard orientations. Stabilizer walls are singlebead structures that slightly penetrate into the tool to help stabilize it during building, shown in Figure 16. The stabilizing structures can easily be removed after the build due to their perforations, similar to a perforated piece of paper.
A top-down view of a stabilizer wall and specific design details are shown in Figure 17. Parameters not detailed are recommended to be left as default.
- The Separation value controls how far the back of the wall is separated from the tool
- The Contact interval value controls how much distance is between each contact leg of the stabilizer wall.
- The Penetration value controls how deep the wall penetrates into the tool.
- The units of these values are the same as the units selected within Insight (inch or mm).
6.3 Non-standard toolpath generation
Generate toolpaths after support structures have been created. Default sparse toolpath settings are recommended for both PC and ULTEM 9085 resin for thermoforming applications. If necessary, air gaps may be increased to facilitate airflow through the tool. This is covered in the following section. Additional custom toolpath modifications can be found within the Custom Groups in Insight best practice document for custom toolpath generation.
6.3.1 Air gap
The air gap between adjacent rasters, or the sparse raster air gap under the custom groups menu (Figure 18), can be increased to induce additional porosity. Increasing the air gap between adjacent rasters will add an air gap between rasters on cap layers. It is recommended to only increase the air gap between adjacent rasters up to 0.003 inch (0.076 mm), or visible holes may appear in the surface of the tool that will transfer to the formed part. Adding specific layers to a custom group is shown in Figure 19 and adding the entire part to a custom group is shown in Figure 20.
Increasing the sparse raster air gap increases the size of the sparse fill cells and will reduce build time and tool strength. Caution should be used when increasing this value from the default as the cells can become too large and the cap layers will not be able to bridge the cells on flat surfaces of the tool as can be seen in Figure 21.
6.3.2 Additional contours around mounting holes
Additional material around mounting holes is recommended to increase the strength of the holes. More material can be achieved by increasing the number of contours around the holes in Insight using a custom group. Create a new custom group using the same parameters as the global parameters, change the number of contours to the desired amount, and check the Apply contour style to selected feature only box as show in Figure 22. The check box ensures that the extra contours are only added to the selected mounting holes and not the entire part.
Add the curves that make up the mounting holes to the custom group. Only the selected features will be in a custom group as shown in Figure 23. The figure also shows the resulting toolpath generation from the custom group.
6.4 Seams
A seam is defined as the start and stop location of a toolpath, as shown in Figure 24. A seam can potentially cause a blemish in the final part if the tool surface in contact with the formed sheet contains seams. Placement of seams is important when processing in Insight for this reason. Seams should be placed on a part of the tool that will not contact the formed sheet, on the least important side of the tool, or on a face where they can easily be smoothed by light sanding after the tool has been built. Seam placement on the part can be changed under the Toolpaths, Seam control menu.
6.5 Save .cmb file
Once all supports, toolpaths and custom groups are satisfactory, generate toolpaths and save the job, creating a .cmb file. The .cmb file is then packed in Control Center™ and sent to the 3D printer for production.